Midi Controller Pro User's Manual (English)
Note: This manual is for users, i.e. people that just use existing setups to control their software. If you are a creator/developer of setups, check the Developer's Manual.
Introduction
Setup with OSX
Setup with Windows
Setup with CoreMidi using an attached USB controller.
File Manager
Introduction
Midi Controller Pro is used to control DAW (Digital Audio Workstation) software remotely in both Windows and OSX hosts. You can use MCP like you would use any standard Midi Controller. MCP contains predefined setups and you can also create your own setups.
The free edition of MCP allows you to use any predefined setup. You can also experiment by creating your own setups, but you cannot save them.If you are interested in that feature, check the Developer's Manual.
Connections
Setting up an OSX host:
- In OSX
- Go to Applications -> Utilites and find the application called Audio Midi Setup
- If the midi window is not visible, view it through menu Window -> Show Midi Window
- Create a new session, select it, enable it.
- Setup a port (default: 5004).
- Select "Who may connect to me" = "Anyone".
- Select the Live Routings to go in/out to that session.
- Note or configure the Bonjour name.
- In Midi Controller Pro
- Select connections.
- Press the "add" button and select "Add OSX host".
- If you see the bonjour name:
- Select it, then the IP/Port entries are filled automatically.
- If you do not see the bonjour name:
- Configure the connection by putting IP/Port and "OSX RTP".
- You may want to learn the IP address your Mac has. You can do that from the Apple menu: Pull down “System Preferences”, Click on the “Network” preference pane, and your IP address will be visible to the right.
- If the iOS device is outside of your local area, then you may need to use your external (router's) IP address and create a Port Mapping entry in your router in order to connect.
- Select the connection and press connect.
- In your OSX DAW Software
- Go to your DAW's midi setup page and select the network midi as the source/target.
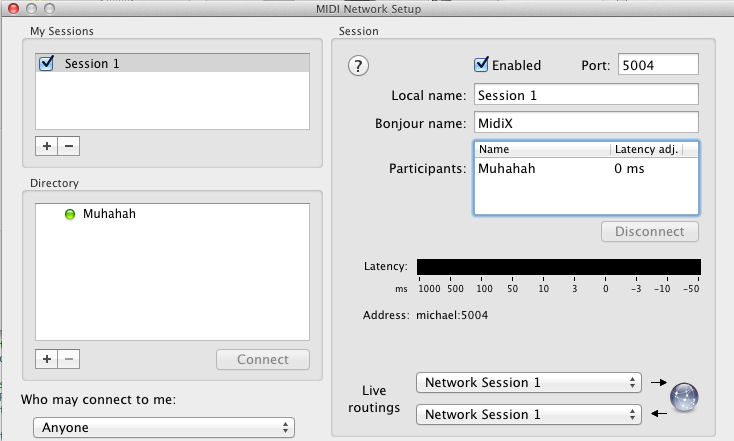
This is how the setup should look like. My iPad device is named "Muhahah" and it's connected. The Bonjour name is MidiX.
Setting up a Windows host:
- In Windows:
- If you don't have already a virtual MIDI driver, download and install free LoopBe1 (http://www.nerds.de/en/loopbe1.html).
- Download and run my Midi Controller Pro for Windows - http://www.turboirc.com/mcp
- Run MCPW.EXE and select a port number and LoopBe1 (or your own Virtual MIDI Driver) as the MIDI out target. MCWP listens in both TCP and UDP mode, and in both IPv6 and IPv4.
- In Midi Controller Pro:
- Select connections.
- Press the "add" button and select "Add Windows host".
- Fill the IP of the target machine, the port you have selected and the method (TCP or UDP). It's preferred to use UDP.
- In your Windows DAW Software:
- Select LoopBe1 (or your own Virtual MIDI Driver) as the MIDI input port.
Setting up a Core Midi.
This setup does not need a PC, because a controller is directly attached to the USB port (via a camera kit, for example).
In Midi Controller Pro:
- Select connections.
- Press the "add" button and select "Add Core Midi".
- Tap the row to select a Core Midi interface. Interfaces with + are active. Interfaces with - were previously connected, but not active.
File Manager
The file manager window allows you to:
- Open existing setups.
- Upload files to be used as graphics.
When the "Save Setups" addon is purchased, this manager also allows to:
- Save or delete setups.
- Share or e-mail setups.